Tuesday, November 26, 2013

A Touch of Gray


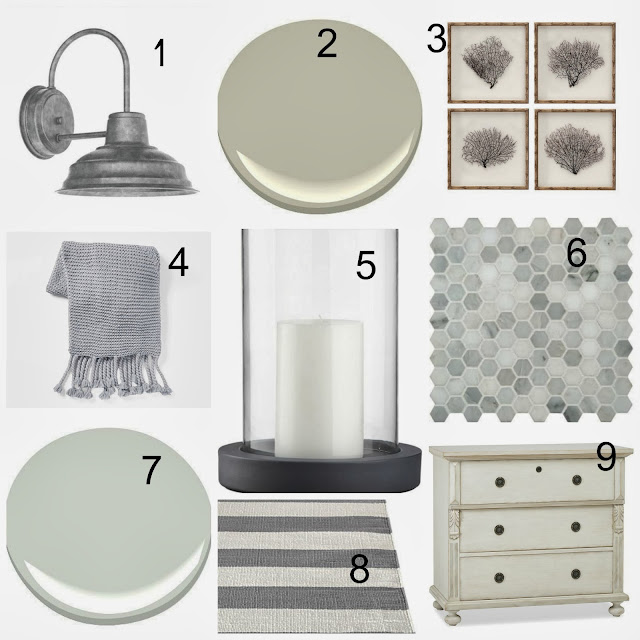
The weathered shingles of a Nantucket cottage. Pebbles on a beach. The ocean at dawn. Gray is a classic, but sometimes overlooked coastal color. Gray can be sophisticated or casual, warm or cool, shy or assertive. There are true grays, greenish grays, blueish grays, and taupe-y grays. Gray can be so pale that it almost appears white or so deep that it's nearly black. With all this variety, it's easy to find the perfect gray to blend with just about any coastal decor. 

1. Barn Light Electrics wall light; 2. BM Hazy Skies; 3. Horchow sea fan art; 4. West Elm throw; 5. CB2 hurricane; 6. Home Depot marble tile; 7. BM Horizon; 8. Crate & Barrel striped rug; 9. Pottery Barn Sophia dresser

1. BM Wickham Gray; 2. Pottery Barn armchair; 3. CB2 pendant; 4. Crate & Barrel lamp; 5.  Pottery Barn gray banded sisal rug; 6. Ikea basket; 7. Williams & Sonoma shell photography; 8. Pottery Barn towels; 9. BM November Skies

© Salt Marsh Cottage 2013

Thursday, November 21, 2013

Elements of a Coastal Christmas


When some people hear the words "Coastal Christmas," they envision lighthouse-shaped ornaments, starfish lights, and driftwood Christmas trees. I'm proposing a less literal interpretation. My thought is to create an approach to Christmas that harmonizes with coastal decor while avoiding the "theme park" look. I base this strategy on three elements: color, materials, and mood.

Let's start with color. The traditional red and green scheme may not work in a coastal home. Consider creating a color palette that complements the colors in your home by combining shades of blue, green, white, taupe, gray, silver, and/or gold.


Live Love DIY


Shorely Chic


Homestyle Diary


For the Love of a House


Southern Hospitality


BHG

Wisteria


Casa Bella


Luckett's Store


BHG

The second element is materials. Incorporating materials like seashells and driftwood is fine, but coastal decor doesn't have to be limited to those obvious choices. In general, natural materials such as foliage, twigs, fruit, and dried grasses blend well with a coastal look.


Shorely Chic


Serendipity Refined


 Canadian Home Trends


Etsy


Etsy


The Lettered Cottage

The final element is mood. Coastal decor is relaxed, unfussy, and casual. Christmas decor should reflect this, so avoid anything too formal, symmetrical, or rigid.


Nell Hill

Enjoy Your Home


Porcelain Garden


BHG


Source Unknown

© Salt Marsh Cottage 2013

Monday, November 11, 2013

Board & Batten Tutorial


When we moved into our house, the base of the snack bar was covered with painted drywall. Not only was it less than inspiring, but it was totally impractical. Within a few weeks it was dirty, scuffed, and shabby looking. My first idea was to cover it with bead board, but then I thought about using board and batten. I loved the look, so I decided to give it a try. It turned out to be an easy and inexpensive project and the results were great. Take a look and then keep reading for the tutorial.

Before

After


Materials:
Lattice molding strips (pre-primed)
Outside corner molding (pre-primed)
Paintable caulk
Satin finish paint
Finish nail gun or construction adhesive
Level

The materials for this project are easy to find and inexpensive. Everything except the paint came from Home Depot. First, decide how many batten strips you want to use. I decided I wanted four strips. Next, measure the distance from the top of the baseboard to the bottom of the counter top. Measure at several different points to be sure you have accurate measurements. Lattice molding comes in 8' lengths. I needed 4 strips 36 1/4" long so I needed to buy two 8' pieces. They run about $4 each. I also needed two 36 1/4" pieces of outside corner molding, This also comes in 8' lengths, so I needed one of those. The outside corner molding ran about $8. I had all the cuts made in the store (they don't charge for doing this). I also picked up a tube of paintable caulk. I have a nail gun (my favorite all-time power tool), but if you don't, you'll also need to pick up a tube of construction adhesive. For the paint you want to get a satin finish latex or oil-based interior paint.

Lattice Molding

 Step 1: Apply lattice strips to the surface.
Decide how you want to space your battens. I ran the two outside pieces right next to the brackets holding up the counter top. Then I took the area in between and divided it into 3 sections. I ended up with 14" between each batten. Use a level to make sure the strips are vertical. Mark the location for each strip with a pencil. Then, using a nail gun or construction adhesive applied to the back of each strip, attach the batten strips to the surface, flush with the top edge of the baseboard molding, making sure to align the strips with your pencil marks. Depending on the type of baseboard molding you have, the lattice strips may be slightly thicker than the molding and overhang a bit. Don't worry, when it's all done it will look fine.


Step 2: Apply outside corner molding to the edges.
Next, to finish off the edges and to create the illusion of actual wood panels, apply the outside corner molding to both ends of the surface. This is best done with construction adhesive.


Step 3: Caulk all seams.
To make the project look neat and finished, you'll need to caulk all the seams between the batten strips and the surface, the baseboard, and the underside of the counter. Same thing with the outside corner pieces. Take your time and be sure not to leave any gaps.

Step 4: Paint.
The final step in the project is painting. For durability, I suggest using three coats. I decided to paint everything white to match the trim in the room...and I hated it. It was too stark and jarring. Then I repainted it in a softer white. Better, but still not what I was looking for. Finally I decided to go with something similar to, but slightly darker, than the wall color. I decided on Benjamin Moore Bennington Gray. Jackpot!


I couldn't be happier with the results. It was a great return on a small investment of time and money. It's a subtle detail, but it really finished off the room. Also, the satin finish paint, unlike the flat paint that had been used previously,  is easy to keep clean. It stands up to scrubbing and it resists scuffs. No more grubby mess!


Take one more look at the "before"...

Before


And now, the "after". Big improvement, don't you think?


After
TDC Before and After

Monday, November 4, 2013

Beach House Dining Part 3: Storage & Lighting


On to the next installment in the dining series. Previous posts looked at dining tables and dining chairs. Now we're going to look at storage options and lighting.

Buffets & Sideboards
Buffets and sideboards not only provide storage for items like table linens and flatware, but they also provide an extra surface for serving. If you're looking for a DIY project, old dressers make great buffets. They provide plenty of storage, can be very budget-friendly, and allow you to choose the exact color, size, and style you like. Blues, greens, grays, and whites are great color choices in a coastal room.
BHG
Miss Mustard Seed
The Modern Cottage

As an alternative to painted finishes, consider the mid-century style Emmerson Buffet from West Elm. I love the Emmerson line. Made from reclaimed shipping pallets, these pieces are reminiscent of drift wood and have a slightly edgy vibe that can prevent coastal decor from reading too "sweet".

West Elm
 Cupboards
Cupboards may lack the serving surface of buffets, but they have two advantages. First, cupboards have a ton of storage. And second, they can provide an attractive display space for collectibles. The cupboard below is primarily for display. The white painted finish makes a great backdrop for blue and green glassware.
Pinterest (source unknown)

Here's another piece from West Elm's Emmerson collection--the Emmerson Display Cabinet. This would look incredible filled with a collection of white ironstone.

West Elm

Nicole from Doodles & Stitches made over a pie safe that had been in her family for years. I love the duck egg exterior with the white interior. A style like this, with closed storage on the bottom and open shelves on the top, is the perfect mix of practical storage and display space to show off collectibles.

Doodles & Stitches

The lovely cupboard has a light gray exterior and a natural wood interior. It would be great for displaying a collection of yellow ware or shells and starfish, as shown here.

Vine
Lighting
Lighting is the last major element needed for a dining space. In choosing lighting, consider the size and shape of your table. A fixture that's too large or too small will throw off the balance of the room. In terms of style, there are a number of different directions to go in.

A simple drum-shaded pendant light always looks clean and unfussy. This one, from Ballard Designs, comes in burlap and jute colors. Either one would be perfect in a coastal setting.  

Ballard Designs

Another classic look is the barn light. This one, from CB2 is quite large (24" in diameter) and would look great over a larger round table. The gunmetal gray color would blend well with blue and green tones. 

CB2

The Hoyne Pendant Lamp from Crate & Barrel has a modern shape while the material gives it an industrial vibe. The airiness of the design would make it blend well with coastal decor. An unexpected, but effective choice.

Crate & Barrel

I'm crazy about this Clift Oversized Glass Pendant from Pottery Barn. It's a substantial 18" in diameter and 26" high. Made of handblown glass, it has a slight greenish tint and bronze cap and chain.

Pottery Barn

Moving in a more traditional direction, the Camilla chandelier, also from Pottery Barn, reminds me of twisted vines and branches. It has a lovely organic quality. I think it would look fabulous over a rustic wood farmhouse table.

Pottery Barn

If you have really high ceilings and a large room, you might want to consider a two-tier fixture like this Parisian Wood & Zinc chandelier from Restoration Hardware. I love the combination of the whitewash finished wood and aged metal.

Restoration Hardware

© Salt Marsh Cottage 2013