Wednesday, February 22, 2017

Dresser Makeover

Hello there! Hope your week is going well. I have another furniture makeover to show you. My friend, V told me she had an old dresser in her attic and wanted to know if I'd like to have it. Do you think I would turn down a piece of furniture? Not so much. V had her son help her load it into the back of her SUV and she drove it over to my house. So the two of us are trying to lift this big, heavy, solid maple dresser out of her car and carry it into the house. Somehow we got our wires crossed and we both picked up the same end instead of opposite ends (I know, it's hard to imagine, but we did it). So the dresser starts to fall..Anyway, we somehow got it into the house without killing ourselves or destroying the dresser. Too bad I don't have it on video...

Moving right along. So dresser was much nicer than I thought it would be. As noted, it's solid maple--a really nice piece of furniture, but it looked really dated. Now I forgot to take a good picture of it before I started, but this is what the finish and the hardware looked liked.


It had some really nice detailing and I thought it would look really nice in a light gray. So I started with a couple of coats of Annie Sloan Chalk Paint in French Linen and gave it a light distressing.


I liked it, but I still felt like it was missing something. The detailing was so pretty, but it wasn't emphasized enough. I decided to add a wash of Old White. I put a couple of tablespoons of paint in a plastic cup and added about a 1/2 cup of water. I brushed it on and then wiped it off immediately. With a technique like this, you don't want it to start dripping. So work in small sections. I really concentrated on working the wash into the detailing.


This was more what I was looking for. I ended up reusing the original hardware. I painted it with Old White (full strength), let it dry a bit, then used a cloth to rub it off in some areas.


The Old White did a great job of emphasizing the detailing. This is another example of a project that ended up going in a different direction than I had originally planned. I think it's important when doing anything creative, to keep an open mind. The best projects are those that seem to evolve.


TDC Before and After

Friday, February 17, 2017

How to Make a Mudroom Rack with Coastal Style

Today I'm going to show you how to make a coat rack for your mudroom or foyer that will hold a ton of stuff, look cool, and is super affordable. Honestly, this is a DIY project anyone can do!


Our mudroom is basically an 8' x 3' hallway between the garage and the house. We needed someplace to hang coats, bags, beach towels, yoga mats, backpacks--you name it.  So I built this rack to run along one of the long walls. Full disclosure--the mudroom never looks like it does in these pictures. We usually have so much stuff hanging in there that you would never be able to see the rack! I did a bit of editing before taking these pics!

Materials

1 x 4 lumber in the length you need. I used an 8' board that fit perfectly on the wall.

4" galvanized boat cleats--I used 8 cleats for an 8' board.

1 " wood screws (2 per boat cleat)

2" wood screws (4-6)

Sander or sand paper (this is the sander I have)

Wood stain (I used this)

Tape measure

Stud finder (optional, but for less than $20, so worth it!)

Drill and drill bits

Pencil

Level


Directions

1. Cut your 1 x 4 to the length you need. (They'll do this for you for free at Home Depot) 

2. Sand all surfaces and round off the long edges of the wood.

3. Apply the stain of your choice and let dry.

4. While you're waiting for the stain to dry, use the level to mark a horizontal line on the wall at the height where you want the top edge of the rack to be.

5. Locate the studs in the wall and mark their locations. Make sure you can see the marks above the horizontal line.


6. Hold the board in place on the wall (you may need someone to hold one end while you do this) and mark the locations of the studs on your board.

7. Now lay the board on the floor. You will need to attach the board to the studs in the wall near each end of the board and at a couple of places in the middle. So start at the ends. Place a boat cleat near each end where the studs are marked. Now place one or two boat cleats over the stud marks in the middle of the board. Then arrange the rest of the boat cleats so they are at even intervals. Mark these locations.
8. Remove all the boat cleats and place to one side. Drill a hole in the middle of each stud line where you will be attaching the rack to the wall. If you have the appropriate drill bit, create a countersink for each screw head. When you're done, the screws will be hidden by the boat cleats. 
9. Using the 1" screws, attach the boat cleats to the marked locations on the board EXCEPT where you have drilled the holes.

10. Now place the rack on the wall with the top edge even with the horizontal line (you may need a helper to hold one end). Place a 2" screw in each hole in the board and screw into the stud to secure the rack to the wall. Countersink the screws.
11. Finally, place the remaining cleats over the screws and attach to the board with the 1" screws.
Now enjoy your new coat rack!


Please note--this post contains affiliate links.


Thursday, February 9, 2017

A Coastal Classic: Driftwood

This is the second in my series on classic elements of coastal style. If you missed the first post in this series, A Coastal Classic: Stripes, click here. Each of the posts in this series will explore a different aspect of coastal style. Today's topic: driftwood.

Clockwise from top left--Pier 1 Driftwood Bowl, Hayneedle Floor Lamp, Wayfair Drum Chandelier, Joss & Main End Table, Wayfair Coffee Table, World Market Driftwood Charger Plate
Nothing sets a coastal tone in a room like driftwood. The grayed color, the organic shape, the interesting texture--it all says coastal and creates a relaxing, casual vibe.

There are lots of ways to use driftwood in your decor from displaying a found piece on your coffee table to using large furniture pieces with a driftwood finish. Driftwood can be found in home accessories like the bowl and charger plate shown above, in lighting like that gorgeous floor lamp and drum pendant, and in all types of furniture. I just love that round coffee table from Wayfair--just look at that texture. And the end table from Joss & Main is a coastal/industrial crossover piece that would look right at home in many rooms.

I found a few more great pieces like this amazing dining table from Joss & Main.

This beautiful dresser from World Market.


And this small console table from Hayneedle. Such a pretty finish!

If you're just looking to add a few small touches of driftwood, check out these candle holders from World Market and Joss & Main.


DIY is another option for adding driftwood touches to your home. I used Annie Sloan Chalk Paint to achieve a driftwood-like finish on my farmhouse table. You can check out the tutorial here. And here's another tutorial  that shows how I achieved a more colorful driftwood look on a small dresser.

Please note--this post contains affiliate links.

Monday, February 6, 2017

Greenery in the Basement


I was recently inspired by Douglas Elliman's Florida real estate team to participate in their Pantone Color of the Year Challenge. The timing was perfect. In my last post I shared the plans for turning our unfinished basement into a family room. Now I want to show you some of my ideas for decorating this space. One of the biggest challenges in a basement is to make it feel light and bright. What better way to do this than with some accents of Greenery--Pantone's 2017 Color of the Year?


Greenery is described as a refreshing and revitalizing shade that evokes the first days of spring. Despite its vibrancy, Greenery is a surprisingly versatile color. However, with a saturated color like this, a little goes a long way. Accents of bright color in a room are like punctuation marks in a sentence. They can bring a new feel and nuance to the decor without taking over the existing color scheme.

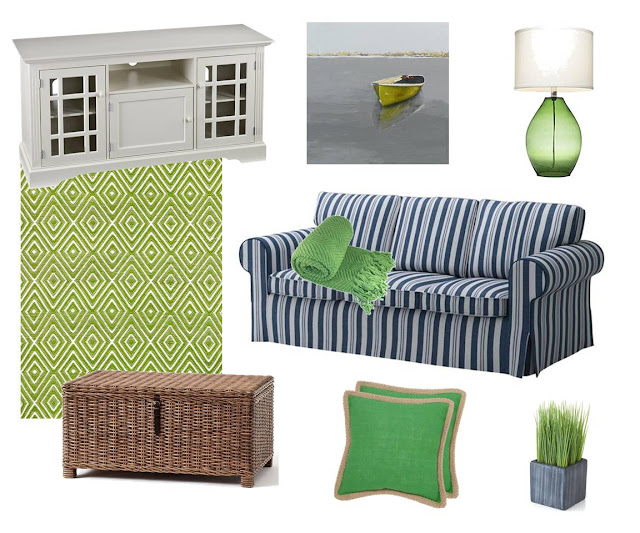
When you want to introduce a new accent color into a room, it often helps to start with an inspiration piece--fabric, artwork, a pillow--that includes both the existing colors in the room plus the new accent color. In this room, we start off with three pieces of furniture: a sleeper sofa, a wicker trunk to serve as coffee table and to store extra bedding, and a white media cabinet. The shades of blue in the slipcovered sofa establish the existing color scheme. 

The inspiration piece for this room is this print from Ballard Designs. It combines the shades of blue in the slipcover and our accent color, Greenery. It's also useful to notice the relative proportions of the colors in the inspiration piece. The smaller green boat pops against the expanse of blue water and sky. This can help you decide how much of the accent color to include in the room relative to the other colors.
Now let's add those accents of Greenery. Start with the biggest piece. In this case, it's this Dash & Albert rug from Birchlane. I chose this because the pattern adds some interest and the white tempers the intensity of the green. By the way, this is an indoor-outdoor rug--perfect for a basement.


The lamp is the next addition. I love the glass base of this lamp. It has a subtle coastal vibe and the transparency of the glass softens the color. 

It's time for some smaller pieces. These green jute pillows with contrasting natural trim have great texture. And in my opinion, every sofa needs a throw blanket for curling up while watching TV or reading. This one has an interesting pattern and a nice drape.

Finally, if you want to add some Greenery, you really should add some actual greenery--as in plant life. Now obviously in a basement, a real plant couldn't survive, but this faux potted grass from Crate & Barrel will do the trick. And notice how the blueish gray color of the pot picks up the color from the sofa slipcover.


So adding accents of Greenery to a room can be simple. Start with an inspiration piece that combines Greenery and the existing colors. Add small doses of Greenery dispersed in different areas of the room and on different materials. Keep in mind that larger pieces should have toned down versions of the color and/or be broken up with other colors to keep from overwhelming the room. Smaller pieces can handle more intense versions of the color. Think about adding accents of Greenery to any room in your home that could use a little refreshing for spring--especially areas with little natural light. It really does add a breath of fresh air.


Thank you to Douglas Elliman's Florida real estate team for inviting me to participate in the Pantone Color of the Year challenge!

Please note--this post contains affiliate links.

Wednesday, February 1, 2017

Next Project: Finishing the Basement

We are ready to move ahead with our next big renovation project: turning our unfinished basement into a family room. Because we love having family and friends stay with us, we're starting to realize we're going to need more space. The current kitchen, dining, and living areas are all open concept--which I love, but sometimes it would be nice to have someplace else for watching TV and playing games. We also need more sleeping space for overnight guests.


The basement is a big blank canvas right now--cement walls and floors, no natural light. But it's dry and spacious. We're planning to finish half of it--an area that's 32' x 14'. That's an extra 450 square feet of living space. It's like getting an addition without, you know, putting on an addition.The other half, which will remain unfinished, will be used for storage, laundry, and mechanics. I'm so excited this is getting underway.

So let me show you my plans. By the way, I used a free online program called Homestyler to draw up this floor plan. It's a little tricky to use, but it does help to get an idea of how everything will fit together. There will be three areas: a table for games and puzzles, a TV and lounging area, and a day bed built into a nook for extra sleeping space. 


I want it to look as light and bright as possible. The walls will be painted BM White Dove. For the floors I'm going with vinyl planks. These are TrafficMaster Allure flooring in Country Pine. They look great and they are waterproof. Believe me, once you've been through a flood waterproof sounds really really good.

For the game table area I'm going to use my Ballard knock off table with the faux zinc finish that used to be our dining table before we got the larger farmhouse table. It will be perfect for playing games and working on puzzles.


This pendant from Ikea will hang over the table.
The TV area will have a sleeper sofa for more guest space. There's a story behind the sofa. A month before Hurricane Sandy dumped two feet of water in our house, I bought new furniture. Timing is everything, right? I bought the Ikea Ektorp sleeper sofa with beautiful blue striped slipcovers. Although the sofa itself was a total loss, we were able to rescue the slipcover and have it cleaned. My plan was that when we moved into a new house, I would buy another sleeper sofa and reuse the slipcover. Great plan, except that when I went to buy a new sleeper sofa, I found out that Ikea had discontinued the Ektorp sleeper (you can't make this stuff up). However, diligent searching on Craig's List eventually turned up an almost new Ektorp sleeper. So, I am finally back in business. I just love this slipcover.
The far end of the room will have a built in day bed. In addition to sleeping space, I think it will be a great space to curl up with a good book or just lounge while watching TV. I'm using another Ikea item, the Hemnes daybed. On each side, I'm going to install the same RH Baby & Child Mariner sconces that I used in the downstairs bathroom


So that's the basic plan. In my next post I'm going to be sharing some ideas I have for decorating this new space.