Saturday, April 1, 2017

Spring Mantel Vignette and a talk about defining style.

Ninety percent of what I share on this blog is from our beach house. Occasionally, however, I do show some projects from our townhouse. The townhouse intentionally has a different style than the coastal decor of the beach house. I'm very much into decor having a sense of place. For example, a tile roofed adobe looks perfect in Santa Fe, but would seem odd in upstate New York. Our townhouse is in an urban neighborhood in the Washington DC area--so different from quiet coastal Rhode Island! Defining the style in the beach house is easy, but I have struggled to come up with a description for the style of the decor in our townhouse. The closest I've been able to come is "urban rustic"--a little bit formal, a little bit industrial, and a little bit vintage. That said, there are similarities in my two styles. Both houses have a grayed palette with lots of white and wood tones. I tend to choose neutral colors for big furniture pieces and add accents of color in terms of pillows, art, and smaller furniture pieces. Texture, whether in wood, fabrics, or building materials, plays a big role.

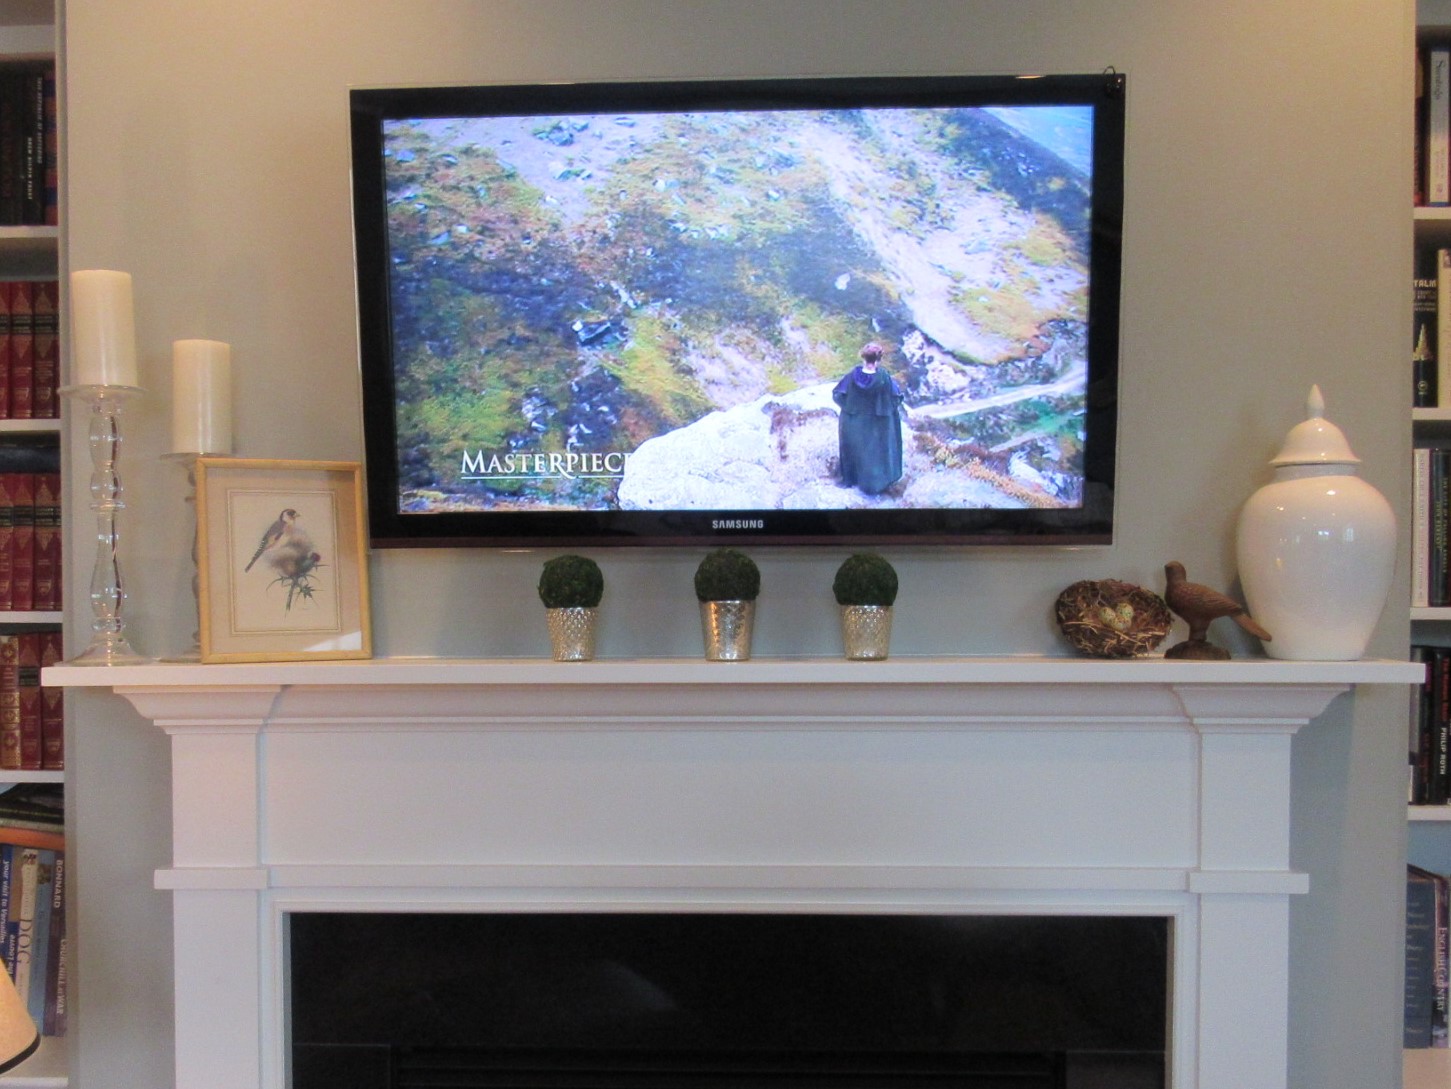
Anyway, today I'm going to show you my spring mantel in the townhouse. I was able to put this vignette together without buying anything new--I just shopped my house. White and silver are the predominant colors with accents of green and brown.


Starting on the left side, I used two clear glass candle holders that I got years ago at a Pottery Barn Outlet and added this sweet vintage print of a bird with a faux bamboo frame that I've had forever. 


In the middle are three little "topiaries" that I made from mercury glass votive folders (Pottery Barn--from several Christmases ago) and moss covered balls that I picked up at Home Goods a while back. 


On the right side I used a bird's nest with little eggs (possibly from Michael's), a cast iron bird figurine (from a vendor at the Boston Flower Show), and this lidded jar I picked up at a consignment shop about ten years ago.


 I really like how fresh and clean the colors look. Although we often associate mercury glass with Christmas, I think it adds just the right amount of light and sparkle when combined with white and green.

By the way, if you're wondering about any of the other pieces in the room, the leather chair and ottoman are from Macy's, the purple velvet throw pillow and the lamp are from Pottery Barn, and the side table is from World Market. The wall color is Silver Fox by Benjamin Moore. Have a lovely weekend!


Friday, March 24, 2017

Finished Basement--First Look


I'm so excited to show you the progress on the finished basement. Here's what we started with just a few weeks ago. Sorry for the blurry pictures. This is what you would see when you walked down the stairs:


And here's what that same view looks like now!


It's an actual room! No decor, furniture, or paint yet, but we have walls, floors, and a ceiling! The door on the left leads to the electrical panel and cable box. The opening on the right (still waiting for the door to arrive...) is a storage closet.

Now here's a before and after looking back towards the stairs:


Same vantage point now:


The opening on the right leads to the stairs. Same direction now looking more to the left:


The door on the right leads to storage under the stairs. The door on the left leads to the unfinished part of the basement.

Did you notice another detail?


Yes, that's a fireplace. I was inspired (who wouldn't be?) by Sarah's (aka Thrifty Decor Chick) awesome finished basement which included an electric fireplace (http://www.thriftydecorchick.com/2016/12/finished-stacked-stone-fireplace-in.html). Genius. So it gave me the idea to add this electric fireplace that would not only give the room a focal point, but also heat this space.

Now obviously, it doesn't look like much at the moment, but remember a few weeks ago I mentioned finding this vintage mantel at a salvage yard? It's pretty rough right now and needs work, but I think it's going to make that electric fireplace look pretty sweet when it's all done.


Thursday, March 9, 2017

Who's Ready for Outdoor Living?


That would be me. The weather's been beautiful here, but there's another cold snap coming (ugh!). To cheer myself up, I've been eyeing some options to upgrade my deck. There are some terrific sales going on right now, so this is a great time to buy while the prices are low and the selection is as good as it gets.

Pier 1 is having an amazing sale--20% off all regularly priced outdoor furniture.  And here's a code for free shipping on all orders $49 and up. Check this baby out!


I could so see this dining set on my deck.


This super-cute striped rug is on clearance--66% off!


Wayfair is having a great outdoor sale, too! Up to 70% off! I would love a couple of chaises like this. Glass of wine. Watch the sunset. 


And I so love this bar cart from Joss & Main. On sale now for 33% off.


And how about some new outdoor pillows. These are all on sale.


This is the year I'm going to spring for a set of Melamine plates for the deck and porch.


Am I the only one who thinks I HAVE to have a set of these string lights for my deck?


Hope you enjoyed this brief break from cold weather. Have a lovely weekend!


Monday, March 6, 2017

How to Work with Reclaimed Wood

Hello there! I'm in the middle of a new project that I'm dying to show you. I'm some building shelves with reclaimed wood. It's still in process, so the meantime, I thought I'd talk a little about how to find reclaimed wood and how to work with it.

What is reclaimed wood?

It's wood that has been retrieved from it's original use and repurposed for a new use. Most reclaimed wood is salvaged from demolished buildings (houses, barns, warehouses). There are so many things I love about reclaimed wood. The texture and variations in color make each piece unique. Plus, when wood is reclaimed and reused, it doesn't end up in a landfill--and you save a few trees. It's a win-win-win situation.

Where can you get reclaimed wood?

There are many sources. There are businesses that specialize in selling reclaimed wood. For example, Stikwood sells self-stick planks of reclaimed wood. It comes in uniform sizes (5" wide and 3/16" thick). It runs $14 per square foot. This is a good option if you want the look of reclaimed wood without doing a lot of work.

However, if you're like me and are up for a DIY project, the best source for reclaimed wood are salvage yards. My favorite is Community Forklift just outside of Washington, DC. There's a huge selection and the prices are unbelievable. For example, I recently bought a whole trunk full of wood for $11. That included a 5 foot 2" x 12", a 4 foot 2" x 12",an 8 foot 2" x 8", an 8 foot 2" x 4", and a few smaller pieces. In addition to lumber, they have other cool stuff like this mantel I picked up for $85! (You'll be seeing more of this mantel in future posts!)


What do you do with the wood once you get it?

If you're dealing with wood from a salvage yard, you'll have a little work ahead of you, but it's all pretty straightforward.

1. First things first.
Cut the wood to the size you need. Remove any loose or protruding nails. If you can't remove the nails, then hammer them flush with the surface of the wood. Also remove any large loose splinters. If there are large splits in the wood, you may have to use some glue to hold it together. I used Liquid Nails, but any good wood glue will do. I like the rustic look of the wood, so I didn't attempt to repair holes or rough spots.

2. Give your wood a bath.
Reclaimed wood is often very dirty. So before you do anything else, you'll have to clean it. You will need heavy rubber gloves, dish detergent, warm water, and a scrubber or brush. Give the wood a good cleaning on all surfaces. Be careful--not only is the wood likely to be dirty, but it will probably have a lot of splinters. That's why you need the gloves--or a good pair of tweezers! When you're done, lean the wood up against a wall and let dry overnight.


3. Now that your wood is nice and clean, thoroughly sand all the surfaces. This is best done with an electric sander. 


4. It's time to add some finish. I like to enhance the wood but keep a natural look. I used Danish Oil in Medium Walnut. Because the surface of the wood was uneven, I found it easier to apply it with a brush rather than a cloth. The oil really soaked into the wood, so I went through quite a bit. It really brought out the texture and depth in the wood. 


5. Extra Credit.
For my project, I needed a five foot 2" x 12" board and an eight foot 2" x 12" board. Although I had no trouble finding the five foot board, they didn't have an eight foot 2" x 12". So I decided to fabricate a 2" x 12" using a 2" x 8" and a 2" x 4".  


Because I'm going for a very rustic look, I decided to use 4" mending plates to attach the boards. 


To give them a more rustic look, I sprayed them with Rust-oleum Flat Metallic Soft Iron Spray Paint. Huge difference! I also picked up some black self-tapping screws. 


Next, I laid the two boards next to each other and applied Liquid Nails to the sides where I wanted to join the boards and pressed them together. Then I arranged the mending plates along the joint at regular intervals and attached them with screws. I didn't want to make it too perfect, so I just eyeballed it.


I let the glue dry overnight and my fabricated 2" x 12" was ready to go. I can't wait to show you the finished project (yeah, once it's actually finished, that is!). Stay tuned.


Wednesday, February 22, 2017

Dresser Makeover

Hello there! Hope your week is going well. I have another furniture makeover to show you. My friend, V told me she had an old dresser in her attic and wanted to know if I'd like to have it. Do you think I would turn down a piece of furniture? Not so much. V had her son help her load it into the back of her SUV and she drove it over to my house. So the two of us are trying to lift this big, heavy, solid maple dresser out of her car and carry it into the house. Somehow we got our wires crossed and we both picked up the same end instead of opposite ends (I know, it's hard to imagine, but we did it). So the dresser starts to fall..Anyway, we somehow got it into the house without killing ourselves or destroying the dresser. Too bad I don't have it on video...

Moving right along. So dresser was much nicer than I thought it would be. As noted, it's solid maple--a really nice piece of furniture, but it looked really dated. Now I forgot to take a good picture of it before I started, but this is what the finish and the hardware looked liked.


It had some really nice detailing and I thought it would look really nice in a light gray. So I started with a couple of coats of Annie Sloan Chalk Paint in French Linen and gave it a light distressing.


I liked it, but I still felt like it was missing something. The detailing was so pretty, but it wasn't emphasized enough. I decided to add a wash of Old White. I put a couple of tablespoons of paint in a plastic cup and added about a 1/2 cup of water. I brushed it on and then wiped it off immediately. With a technique like this, you don't want it to start dripping. So work in small sections. I really concentrated on working the wash into the detailing.


This was more what I was looking for. I ended up reusing the original hardware. I painted it with Old White (full strength), let it dry a bit, then used a cloth to rub it off in some areas.


The Old White did a great job of emphasizing the detailing. This is another example of a project that ended up going in a different direction than I had originally planned. I think it's important when doing anything creative, to keep an open mind. The best projects are those that seem to evolve.


TDC Before and After